- New Arrivals
- Gift Guide
-
Products
- Audio & Sound
- Augmented Reality
- Batteries
- Bluetooth
- Cables & Adapters
- Cameras
- Camping & Outdoor
- Car Accessories
- Cases & Covers
- Chargers
- Computer Peripherals
- Desktop Stands
- Docks & Cradles
- Fancy Dress
- Fun & Useful
- Game Controllers
- Handyman Tools
- Health & Wellbeing
- Keyboard & Mouse
- Kitchenware
- Lighting
- Memory Cards
- Networking
- Office & Commercial
- Pet Supplies
- Power Banks
- Screen Protectors
- Smart Home
- Sports & Fitness
- Stylus
- Toys & Collectables
- Travel
- Video
- Virtual Reality
- Wearables
- Wireless Charging
- Shop by Device
- Support
- Contact Us
Basket
Your basket is empty.
Secure Payment Gateway
(0)
Home Shop by Device Best Skins Ever Application Guide
Best Skins Ever Installation Guide
Please read all of the instructions before you begin. Don't get ahead of yourself.
The pictures in the instructions are of a Nano skin application but these general instructions apply to all skins. If you have any questions, do not hesitate to contact us.
Suggestions before you begin…
- DO NOT APPLY APPLICATION SOLUTION DIRECTLY TO YOUR DEVICE! We can’t stress this enough.
- Apply the front skin to your device first. This way the front is protected when you turn it over to apply the rear skin.
- You can do the entire application in a steamy bathroom if you're concerned about dust trapping under the skin during application.
- These instructions apply to the front and rear application with the exception of the extra steps to fold over the side flaps of the rear skin.
- TURN YOUR DEVICE OFF AND ENGAGE THE HOLD SWITCH! Take out the battery if it's removable.
-
Wash your hands and clean any fingerprints from your device. Next, in a spray bottle, mix about 1/4 teaspoon of mild liquid soap with about 300ml of water to make the application solution. We have found that baby shampoo or mild liquid dish soap work best. Stay away from soaps with additives such as anti-bacterial, degreaser, moisturizer and creamy hand soaps. If it's too hard to get your hands on some of these, a standard window cleaner like windex will work as well - just don't spray too much.
Note: If you don't have a spray bottle you can simply mix the solution in a shallow dish and dip the Skin into the solution. -
Identify the function pieces of the Skin and determine what parts of the device they are applied to.
Tip: Keeping your finger tips wet with solution will prevent your fingers from sticking to the adhesive and leaving finger prints on the underside of the skin. -
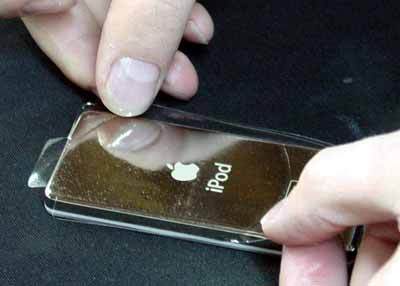
Spray your fingers with the solution and peel the skin from the liner. Spray the adhesive side thoroughly as you peel it from the liner. Do not lose track of which side of the Skin was stuck to the liner! This is the side that will adhere to the device.
Tip: We highly suggest using a spray bottle when applying large pieces such as laptop Skins. It helps to have an extra hand with the large pieces to spray the Skin as you peel it from the liner. The solution will prevent the Skin from folding over and sticking to itself once it's removed from the liner. -
Lightly shake excess water from the Skin. It doesn’t need to be dripping wet; a thin film of solution works the best.


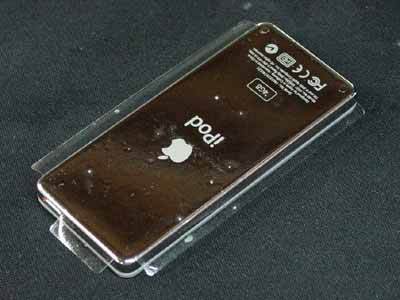
- Slowly lay the Skin onto the device and slide it into position. The Skin should slide freely on the surface of your device at this point. If it doesn’t, try adding a little more soap to your water and re-wetting the film.
- Begin by pressing some of the water out from under the film with your fingers being careful not to move the Skin from its place.
- Use a credit card (or something similar) to squeegee the remainder of water and bubbles out from under the film. To avoid damaging the Skin, be sure to feel the edge of your card (or similar item) to ensure that it does not have any rough edges.
-
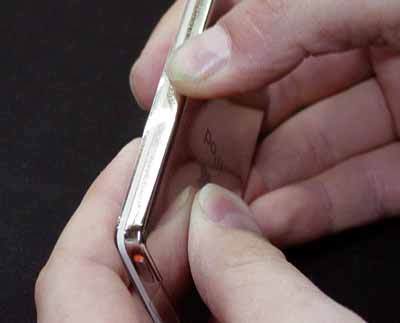
If you are applying a skin with flaps, corners or areas that won’t stick down, give the Skin about 15-30 minutes for the solution to evaporate. Then wrap the area over and press it down with your thumb or palm of your hand for about 30 seconds.
Note: It's important to understand the adhesive is not water-soluble. It will only prolong the issue if you add more solution to areas that are having trouble adhering. -
After pressing down the last area, we suggest that you let the Skin set up for 24 hours before turning on the device. The Skin material is "gas permeable". As such, the look of your Skin will improve over the next 24-48 hours as the solution and micro bubbles evaporate and the adhesive sets up.
Tip: Take the time to store your extra Skins in the envelope or a zip lock bag. Do Not store any unused skins face to face. They will stick together.
**If you see bubbles you are unable to remove or are unhappy with the placement of your Skin, now is the time to remove it and return to step 1. After it has set up for 15 minutes or more you may not be able to remove the Skin without stretching it.

Removal: When you're ready to remove the Skin you can simply peel it off. For best results peel slowly and don't peel the Skin back over itself. Peel the Skin away from itself at an angle of 45 degrees or less.
Check out our full range of Best Skins Ever to see if your device is supported.


